

After creating your School Profile and at least one Test Subject, you can now create a Test. To access or create a Test, press the Teacher menu, followed by the Tests sub menu, followed by the Quizzes/Tests/Exams sub menu, and finally the New/Modify sub menu as shown above in the application (highlighted in red).
The top portion of the Tests screen is then displayed as shown below.

To create a test, press the NEW TEST button. This will display the New Test screen as shown below.
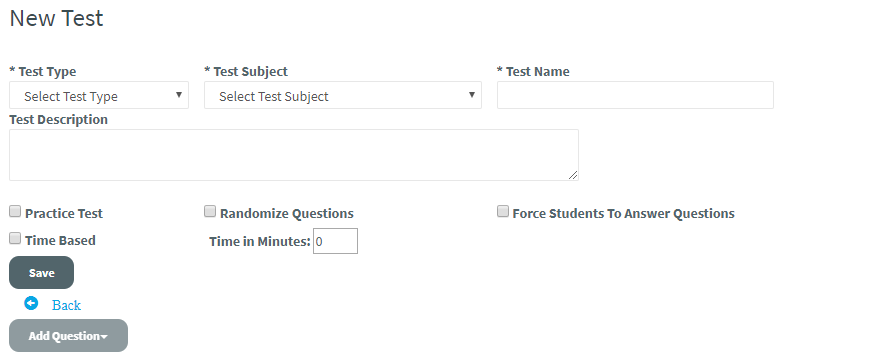
The following describes each field 1 through 5 and how it is used in the application. All fields preceded with an * indicates a mandatory field.

(1) Test Type is a dropdown list preloaded with the values of quiz, test, and exam. The test types are associated with test subject categories which affect weighing when generating progress reports and report cards. See the Test Subjects documentation.
(2) Test Subject is a dropdown list of test subjects created via the Test Subjects screen.
(3) Test Name is a non-unique name given for a quiz, test, or exam.
(4) # of Questions is a read-only field that display the number of questions associated with the test. The field will be hidden if there are no questions.
(5) Test Description is a detailed explanation of your Test that will help better identify the given test name and its applicability.
The following describes each field 6 through 10 and how it is used in the application. All fields preceded with an * indicates a mandatory field.

(6) Practice Test when enabled will cause the test to not be counted toward the student's overall grade when generating progress reports and report cards.
(7) Randomize Questions enables questions to display in a different order each time the student enters the test.
(8) Force Students To Answer Questions forces a student to answer every question on the test before it can be submitted for grading.
(9) Time Based when checked puts a time restriction on the length of time the student has to take the test.
(10) Time in Minutes must a have a value entered when Time Based is checked. As the student takes the test, the application will automatically submit the test to be graded when the time runs out.
The following describes field 11 through 13 and how it is used in the application.
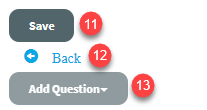
(11) To save the Test, press the Save button. A message will display indicating that the test was saved successfully.
(12) Back when pressed will send you back to the previous screen.
(13) Add Question when clicked will allow you to choose from 7 question types. Note: The button is disabled until the test is initially saved. It is also disabled once a test has been assigned to a student, whether or not the student started or completed the test, or after the student test has been graded. The purpose is integrity of the "master" test. Although the test can still be edited, it can only be modified with limitations (Hence the link name will change from Edit to Modify. Other features that are also not allowed when modifying an existing test is that you cannot delete an question or add/remove multile answers for question types (Multiple Choice, Multiple Select, Multiple Answer, Spelling, and Matching). If the test must be modified, than either (1) all students must be unassoicated with the test or better (2) a clone of the test can be made with a different test name to distinguish between the two like tests.
After you create your first question, you will notice a toggle appear, called Toggle Test Header as shown highlighed in the application below. The toggle's default is "on" when shown as green.

Click the toggle button to hide the header information. The toggle is now "off" when yellow as shown in the application below. This provides more real estate when viewing the associated questions.

The following describes each field 14 through 22 and how it is used in the application. Upon returning to the previous screen or entering the screen from the menu, you will see a list of your existing tests. From the list, you can edit, modify, print, clone, and delete a test.
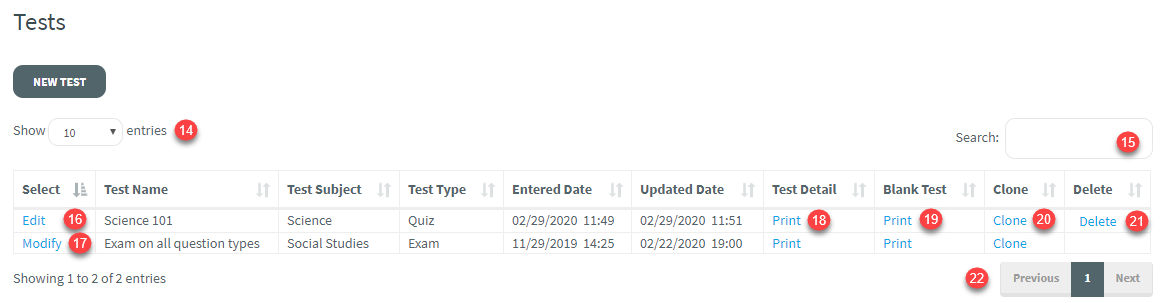
(14) Show entries when pressed presents a dropdown list with the values of 10, 25, 50, and 100. The number selected will translate to the number of test entries displayed on the screen.
(15) Search can be any value that when entered will filter only those tests where a match is found in the columns.
(16) Edit when pressed will take you to the Edit Test screen where you can then update the existing test.
(17) Modify when pressed will take you to the Edit Test screen where you can then update the existing test. Note: Because a test can be assigned and already taken by a student, there are limitations of what can be altered, such as adding or deleting questions and adding or deleting test question answers -- i.e., Multiple Choice. This is crucial when assigning the existing test to a student in the future and when generating reports on historical student test data. An alternative would be to clone the test instead.
(18) Print when pressed will produce the Test Detail report which is an exact carbon copy of the test including all the available questions, the available answers -- i.e., Multiple Choice, and the correct answer. The report will generate in a new window or tab. Once the report is rendered, you will be able to export the report to Microsoft Word, Excel, PowerPoint, a PDF, Tiff, MHTML (web archive), CSV (comma delimited), XML file with report data, and a Data Feed.
(19) Print when pressed will produce a Blank Test report which is an exact carbon copy of the test including all the available questions, the available answers -- i.e., Multiple Choice, but NOT the correct answer. Students can use this print to take the test manually as an alternative if other methods are used outside of MyKidQuiz to grade and keep track of grades and progress. The report will generate in a new window or tab. Once the report is rendered, you will be able to export the report to Microsoft Word, Excel, PowerPoint, a PDF, Tiff, MHTML (web archive), CSV (comma delimited), XML file with report data, and a Data Feed.
(20) Clone when pressed will make an exact replica of the existing test and appear immediately in the listing. You can then proceed to edit the cloned test as you would to any other created test.
(21) Delete when pressed will delete the test. Note: If a test is assigned and already taken by a student, the Delete link will not be made available.
(22) Pagination when pressed will allow you to navigate to the Previous, individual numbered, or Next page of tests. If 10 or less tests exist or 10 tests are displayed based on the minimal value of 10 in the Show entries field, then the pagination will display just 1 page and the pagination will be disabled. If multiple pages exist, then the Previous, individual numbered, and Next buttons will be available for navigation.
To learn how to create a question, press the following question links below.

After creating at least one Test, you can now create a Test from one or more existing tests. To do this, press the Teacher menu, followed by the Tests sub menu, followed by the Quizzes/Tests/Exams sub menu, and finally the Create from existing... sub menu as shown above in the application (highlighted in red).
The top portion of the Tests (New from existing...) screen is then displayed as shown below.
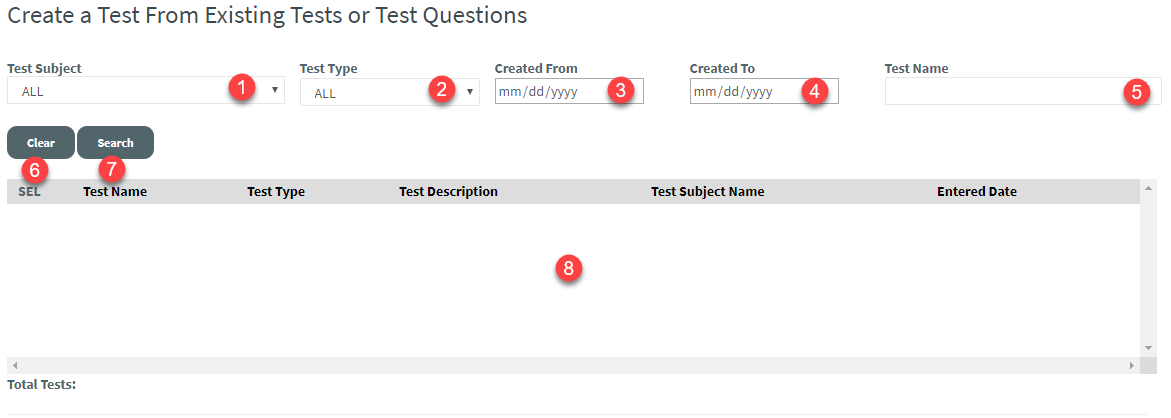
The following describes each field 1 through 8 and how it is used to search for existing tests in the application.
(1) Test Subject is a dropdown list of test subjects created via the Test Subjects screen.
(2) Test Type is a dropdown list preloaded with the values of quiz, test, and exam. The test types are associated with test subject categories which affect weighing when generating progress reports and report cards. See the Test Subjects documentation.
(3) Create From is a date that when entered will find all tests created from that point in time.
(4) Create To is a date that when entered will find all tests created up until that point in time.
Note: If both dates are entered, tests will be returned that fall within the date range. If both dates are left blank, the date filters are ignored. This rule applies to all the filters above.
(5) Test Name can be entered fully or as a wildcard search to maximize your search results. The characters entered must exist consecutively. For example, if a test is called Science 101, you can search on ien or e 101. The search will ignore any characters to the left and to the right of the characters entered.
(6) To clear the above filters, press the Clear button.
(7) To find the Tests based on your search criteria, press the Search button. The results will display in the grid as shown in the application below.

(8) To display the associated questions, check the checkbox under the SEL heading. The questions will display in another grid as show in the application below.
Note: You can select as many tests as desired. If all tests are selected (checked), then all the questions are displayed.

The following describes each field 1 through 7 and how it is used to create your new test.
(1) Test Type is a dropdown list preloaded with the values of quiz, test, and exam. The test types are associated with test subject categories which affect weighing when generating progress reports and report cards. See the Test Subjects documentation.
(2) Test Subject is a dropdown list of test subjects created via the Test Subjects screen.
(3) Test Name is a non-unique name given for a quiz, test, or exam.
(4) Check/Uncheck All checkbox when pressed will select all the questions. Press again to unselect.
(5) SEL checkbox when pressed will select the Paragraph question to be added to the new test. Press again to unselect.
(6) SEL checkbox when pressed will select the True and False question to be added to the new test. Press again to unselect.
(7) To save the new Test, before sure to select a Test Type, Test Subject, and Test Name above, then press the Save button. After the test is created, you will be redirected to the newly created test in the Edit Test screen as shown in the application below.

NOTE:
Hovering over some of the controls will display tooltips.